
Ear Piercing Guide: A Comprehensive Overview (Updated 01/27/2026)
This guide details ear anatomy, piercing locations, processes, aftercare, and potential risks, ensuring a safe and informed experience for enthusiasts seeking body modification․
Ear piercing is a globally practiced form of body modification, steeped in history and evolving with contemporary trends․ From ancient civilizations utilizing ear adornments for status and spirituality, to modern expressions of personal style, the practice continues to captivate․ Understanding the ear’s intricate anatomy – the outer, middle, and inner ear – is crucial before considering any piercing․
This guide provides a comprehensive overview, covering everything from selecting a reputable piercer and ensuring strict sterilization protocols, to navigating jewelry material options and diligent aftercare․ We’ll explore popular piercing locations, detailing the unique considerations for each, and address potential risks like infection, allergic reactions, and keloid formation․
Proper hygiene and meticulous aftercare are paramount to successful healing and minimizing complications․ This resource aims to empower individuals with the knowledge needed to make informed decisions and enjoy a beautiful, safely executed ear piercing․
Understanding Ear Anatomy for Piercing
A thorough grasp of ear anatomy is fundamental for safe and successful piercing․ The ear comprises three main sections: the outer, middle, and inner ear, each with distinct structures vital for hearing and balance․ The outer ear funnels sound waves towards the eardrum, separating it from the middle ear․ This section is primarily cartilage, influencing piercing placement and healing times․
The middle ear transmits sound vibrations via tiny bones to the inner ear, housing the cochlea – responsible for converting vibrations into neural signals․ The inner ear also contains the vestibular nerve and semicircular canals, crucial for maintaining equilibrium․
Cartilage piercings, unlike lobe piercings, require greater care due to slower healing and increased infection risk․ Knowing the location of these structures informs jewelry selection and aftercare routines, minimizing potential complications․

The Three Sections of the Ear
The ear’s structure is divided into outer, middle, and inner sections, each playing a crucial role in sound wave transduction and maintaining balance․
The Outer Ear: Structure and Role
The outer ear is the visible portion of the auditory system, comprised of the pinna (auricle) and the ear canal․ The pinna, uniquely shaped in each individual, collects sound waves and funnels them towards the ear canal․ This canal, approximately 2․5 centimeters long, directs sound towards the tympanic membrane, or eardrum․
Beyond sound collection, the outer ear also contributes to sound localization, helping us determine the source of a sound․ Its cartilaginous structure provides support and shape․ Piercing locations within the outer ear, like the lobe, helix, and tragus, are popular due to their visibility and relatively easier healing compared to cartilage piercings deeper within the ear․ Understanding the outer ear’s anatomy is vital for piercers to accurately place jewelry and minimize potential complications․ Hygiene in this area is paramount to prevent infection․
The Middle Ear: Function and Components
The middle ear is an air-filled cavity separating the outer ear from the inner ear, playing a crucial role in sound transmission․ It houses three tiny bones – the malleus (hammer), incus (anvil), and stapes (stirrup) – collectively known as the ossicles․ These bones amplify sound vibrations received from the eardrum and transmit them to the oval window, an opening leading to the inner ear․
The Eustachian tube connects the middle ear to the nasopharynx, equalizing pressure and allowing for proper eardrum function․ While not directly pierced, the proximity of certain cartilage piercings (like the daith or rook) to the middle ear necessitates extreme caution during the procedure․ Infection in the middle ear can occur, though less common from piercings, and requires medical attention․ Maintaining a sterile environment is key to protecting this delicate area․
The Inner Ear: Hearing and Balance
The inner ear contains the cochlea, responsible for converting sound vibrations into neural signals the brain interprets as hearing, and the vestibular system, crucial for maintaining balance․ The cochlea, a snail-shaped structure, is filled with fluid and lined with hair cells that vibrate in response to sound․ These vibrations trigger nerve impulses sent via the auditory nerve to the brain․
The vestibular nerve and semicircular canals detect head movements and position, contributing to our sense of equilibrium․ Due to its complexity and delicate nature, the inner ear is rarely directly pierced․ However, complications from poorly executed cartilage piercings, particularly those close to the inner ear, could potentially affect balance or hearing․ Prioritizing experienced piercers and meticulous aftercare is paramount to safeguarding this vital sensory organ․

Popular Ear Piercing Locations
Numerous locations exist for ear piercings, ranging from the classic lobe to cartilage areas like the helix, tragus, conch, and industrial, offering diverse aesthetic options․
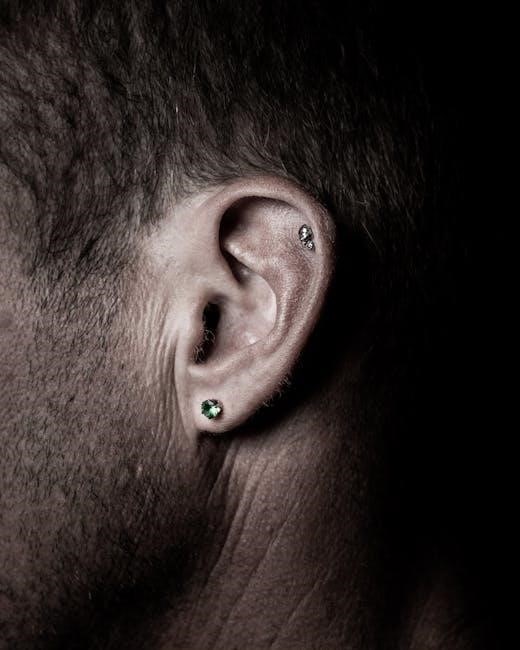
Lobe Piercing: The Classic Choice
Lobe piercings represent the most traditional and widely practiced form of ear piercing, favored for their relative simplicity and minimal discomfort․ This placement involves puncturing the soft, fleshy lower portion of the earlobe, making it generally more accessible and less prone to complications compared to cartilage piercings․ Healing times are typically faster, ranging from six to eight weeks with proper aftercare, involving regular cleaning with saline solution․
Due to their popularity, lobe piercings offer a vast array of jewelry options, from simple studs to elaborate dangling earrings, allowing for versatile self-expression․ However, even lobe piercings require diligent hygiene to prevent infection․ Choosing a reputable piercer employing sterile techniques is crucial․ Potential risks, though minimal, include infection, allergic reactions to jewelry materials, and the development of keloids, particularly in individuals predisposed to them․ Proper aftercare significantly minimizes these risks, ensuring a beautifully healed piercing․
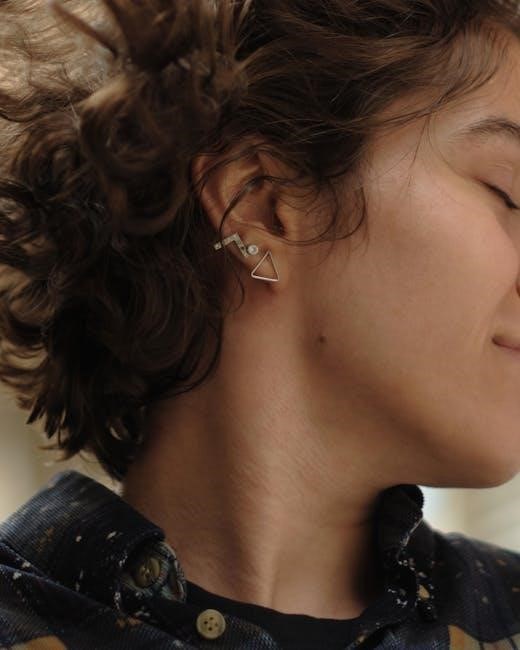
Helix Piercing: Along the Upper Cartilage
Helix piercings adorn the outer upper cartilage of the ear, offering a stylish and versatile aesthetic․ This piercing type generally requires a skilled piercer due to the density of the cartilage, which can make the process slightly more uncomfortable than lobe piercings․ Healing times are considerably longer, typically spanning six to nine months, sometimes extending to a year, demanding consistent aftercare․
Maintaining meticulous hygiene is paramount to prevent infection, a more significant concern with cartilage piercings․ Jewelry choices should prioritize high-quality materials like surgical steel or titanium to minimize allergic reactions․ Potential complications include prolonged swelling, redness, and the formation of hypertrophic scars or keloids․ Proper aftercare, including regular saline soaks and avoiding excessive handling, is vital for successful healing․ Selecting an experienced piercer and adhering to their guidance are key to a positive outcome․
Forward Helix Piercing: Near the Face
The forward helix piercing, located on the inner cartilage fold closest to the face, is a popular choice for its visibility and unique aesthetic․ However, its proximity to facial features and thinner cartilage make it prone to migration and rejection if not executed and cared for properly․ Healing times are extended, often ranging from six to twelve months, requiring diligent aftercare routines․
Due to the piercing’s location, it’s crucial to select a highly experienced piercer familiar with the specific challenges of forward helix placements․ Jewelry material is critical; opting for implant-grade titanium or surgical steel minimizes irritation and allergic reactions․ Infection risk is elevated with cartilage piercings, necessitating strict hygiene practices․ Watch for signs of infection and consult a professional promptly․ Careful consideration and commitment to aftercare are essential for a successful and beautiful forward helix piercing․
Tragus Piercing: The Small Cartilage Flap
The tragus piercing, adorning the small flap of cartilage that partially covers the ear canal, offers a subtle yet stylish aesthetic․ This piercing is known for being relatively quick to heal compared to other cartilage piercings, typically taking between six to eight months with consistent aftercare․ However, its location within the ear can make cleaning more challenging, increasing the risk of infection if not diligently maintained․
Choosing a skilled piercer is paramount, as accurate placement is crucial to avoid damaging the ear canal․ Jewelry options often include labret studs or small captive bead rings, crafted from biocompatible materials like titanium or surgical steel․ Proper aftercare involves regular saline soaks and avoiding pressure on the piercing․ Be vigilant for signs of infection, such as redness, swelling, or discharge, and seek professional attention if needed․
Conch Piercing: The Inner Cartilage Bowl
The conch piercing, situated within the inner cartilage bowl of the ear, presents a versatile canvas for showcasing diverse jewelry styles․ There are two main types: inner and outer conch piercings, differing in placement and healing times․ Inner conch piercings, closer to the ear canal, generally take longer to heal – around 6-12 months – and can be more prone to irritation․
Suitable jewelry includes captive bead rings, circular barbells, or studs, prioritizing biocompatible materials to minimize allergic reactions․ Due to its location, the conch piercing requires meticulous aftercare, including regular saline soaks and avoiding sleeping on the pierced ear․ Infection risks are present, so monitoring for redness, swelling, or discharge is vital․ A reputable piercer will ensure proper placement to avoid potential complications related to cartilage damage․

Rook Piercing: The Ridge Above the Tragus
The rook piercing, a cartilage piercing located on the inner ridge above the tragus, is gaining popularity for its unique aesthetic and relatively hidden placement․ This piercing traverses a fold of cartilage, demanding a skilled piercer to ensure accurate placement and minimize complications․ Healing times are notably longer, typically ranging from 6 to 12 months, or even longer for some individuals․
Jewelry options commonly include curved barbells or captive bead rings, crafted from biocompatible materials like surgical steel or titanium to reduce allergy risks․ Proper aftercare is crucial, involving regular saline soaks and avoiding any pressure on the piercing site․ Due to its location within a cartilage fold, the rook piercing is susceptible to irritation and migration, necessitating diligent monitoring for signs of infection or improper healing․
Daith Piercing: The Innermost Cartilage Fold
The daith piercing, situated within the innermost cartilage fold of the ear, has become a favored choice for its distinctive appearance and purported benefits for migraine sufferers, though scientific evidence remains limited․ This piercing requires a skilled and experienced piercer due to the complex anatomy and potential for complications․ The piercing process involves navigating through a substantial amount of cartilage, leading to a longer healing period – typically 6 to 9 months, and sometimes extending to a year or more․
Common jewelry choices include captive bead rings or circular barbells, prioritizing biocompatible materials like titanium or surgical steel to minimize allergic reactions․ Meticulous aftercare, including regular saline soaks and avoiding pressure, is vital to prevent infection and promote proper healing․ Cartilage infections associated with daith piercings can be severe, necessitating prompt medical attention․
Industrial Piercing: Connecting Two Cartilage Points
The industrial piercing, a bold statement in ear adornment, spans the upper cartilage with a single piece of jewelry, typically a straight barbell, connecting two separate points․ This piercing demands precise execution by a highly skilled piercer, as accurate alignment and sufficient cartilage thickness are crucial for successful healing and minimizing complications․ Due to its length and the cartilage involved, the healing process is extended, often ranging from 6 to 12 months, or even longer․
Choosing a high-quality, biocompatible barbell – titanium is often recommended – is essential to prevent allergic reactions and promote healing․ Maintaining diligent aftercare, including regular saline soaks and avoiding any pressure or snagging, is paramount․ Infections and migration are potential risks, highlighting the importance of a reputable piercer and consistent care․

Piercing Process and Considerations
Selecting a skilled piercer with strict hygiene protocols is vital; sterilization minimizes infection risk, while jewelry material choices impact healing and allergies․
Choosing a Reputable Piercer
Selecting a qualified and reputable piercer is paramount for a safe and positive ear piercing experience․ Thorough research is essential; look for studios with visible licenses and certifications, demonstrating adherence to health and safety standards․
Observe the studio’s cleanliness meticulously․ A reputable piercer maintains a sterile environment, utilizing single-use, disposable equipment and adhering to strict hygiene protocols․ Don’t hesitate to ask about their sterilization procedures – autoclaves are a must․
Review the piercer’s portfolio to assess their skill and experience․ Look at healed piercings, ensuring consistent quality and precision․ A skilled piercer will discuss your anatomy, desired placement, and jewelry options, offering personalized advice․
Read online reviews and seek recommendations from trusted sources․ A piercer with consistently positive feedback is a good indicator of their professionalism and expertise․ Avoid piercers offering extremely low prices, as this may compromise hygiene or quality․

Sterilization and Hygiene Protocols
Rigorous sterilization and hygiene are non-negotiable aspects of safe ear piercing․ Reputable studios utilize autoclaves – machines employing high-pressure steam to eliminate all microorganisms – for sterilizing reusable instruments․ Single-use, disposable equipment, like needles and jewelry packaging, should be standard practice․
Surface disinfection with hospital-grade solutions is crucial for all work areas․ Piercers must wear gloves throughout the procedure, changing them between clients to prevent cross-contamination․ Proper handwashing techniques are also essential․
The skin around the piercing site is thoroughly cleaned and disinfected before the procedure, typically with an antiseptic solution like iodine or chlorhexidine․ Sterile saline solution should be used for aftercare, avoiding harsh chemicals or alcohol-based products․
Confirm the piercer follows universal precautions, treating all blood and bodily fluids as potentially infectious․ A commitment to these protocols minimizes the risk of infection and ensures a safe piercing experience․
Piercing Jewelry Materials: A Guide
Selecting appropriate jewelry material is vital for successful healing and minimizing allergic reactions․ Surgical stainless steel is a common, affordable option, but may contain nickel, a potential allergen․ Implant-grade titanium is hypoallergenic and ideal for initial piercings, promoting faster healing․
Solid 14k or 18k gold is another hypoallergenic choice, though karatage impacts durability and price․ Avoid gold-plated jewelry, as the plating can wear off, causing irritation․ Niobium is a biocompatible metal, often used in intricate designs․
Acrylic and glass are sometimes used for initial piercings, but aren’t ideal long-term due to porosity and potential for bacterial buildup․ Ensure jewelry is polished and free of imperfections․
Consider the gauge (thickness) and length of the jewelry, ensuring proper fit for the piercing location and allowing room for swelling during healing․
Aftercare and Healing
Proper aftercare, including cleaning solutions and techniques, is crucial for preventing infection and promoting optimal healing of your new ear piercing․
Initial Aftercare Steps (First 24-48 Hours)
The first 24-48 hours post-piercing are critical for initiating proper healing and minimizing complications․ Immediately following the procedure, gently clean the piercing site with a sterile saline solution, as recommended by your piercer․ Avoid harsh soaps, alcohol, or hydrogen peroxide, as these can irritate the delicate tissue․
Resist the urge to touch or rotate the jewelry unnecessarily, as this can introduce bacteria and disrupt the healing process․ Keep the area dry and protected from potential irritants like hair products, makeup, and clothing․ Applying a small amount of antibiotic ointment, if advised by your piercer, can help prevent infection․ Be vigilant for any signs of redness, swelling, or discharge, and consult a healthcare professional if concerns arise․
Cleaning Solutions and Techniques
Maintaining optimal hygiene is paramount throughout the ear piercing healing process․ A sterile saline solution – typically 0․9% sodium chloride – is the gold standard for cleaning․ Avoid harsh chemicals like alcohol, hydrogen peroxide, or antibacterial soaps, which can impede healing and cause irritation․
To clean, saturate a clean gauze pad or cotton ball with the saline solution and gently apply it to the piercing site, removing any crust or debris․ Avoid using cotton swabs, as fibers can become lodged in the piercing․ Clean the piercing two to three times daily during the initial healing phase․ Afterwards, once or twice daily is sufficient․ Always wash your hands thoroughly before touching the piercing․
Signs of Infection and When to Seek Help
Recognizing infection is crucial for timely intervention․ While some redness, swelling, and tenderness are normal initially, escalating symptoms warrant attention․ Look for excessive redness extending beyond the piercing site, persistent or worsening pain, thick yellowish-green discharge (pus), fever, or swollen lymph nodes near the piercing․
Mild irritation can often be managed with increased cleaning, but suspected infections require professional medical evaluation․ Do not remove the jewelry unless advised by a doctor, as this can trap the infection․ Consult a healthcare provider immediately if you observe signs of severe infection․ Cartilage piercings are particularly prone to more serious complications and require prompt treatment․
Healing Timelines for Different Piercings
Healing durations vary significantly based on piercing location and individual factors․ Lobe piercings generally heal fastest, typically within 6-8 weeks with diligent aftercare․ Cartilage piercings, however, require considerably more time․ Helix piercings can take 6-9 months, while forward helix and tragus piercings may need 8-12 months to fully heal․
More complex cartilage piercings like daith, rook, and industrial piercings often extend the healing process to a year or even longer․ Consistent aftercare is paramount throughout the entire healing period․ Even after initial healing, piercings can remain sensitive and prone to irritation․ Patience and proper maintenance are key to preventing complications and ensuring long-term health․

Potential Risks and Complications
Infections, allergic reactions to jewelry, cartilage damage, and keloid formation represent potential risks; diligent hygiene and quality jewelry minimize these complications effectively․
Infection Prevention and Management
Preventing infection is paramount after ear piercing․ Maintaining strict hygiene protocols, both during and after the procedure, significantly reduces risk․ Choosing a reputable piercer committed to sterilization is the first crucial step․ Following the piercing, diligent aftercare is essential․ This includes regular cleaning with recommended solutions – typically saline solutions – and avoiding touching the piercing with unwashed hands․
Recognizing infection signs is vital․ Increased pain, redness, swelling, pus-like discharge, and warmth around the piercing site are all indicators․ If any of these symptoms appear, seeking professional medical attention is crucial․ Self-treating can worsen the infection․ A doctor may prescribe antibiotics, either topical or oral, to combat the infection․ Cartilage piercings are particularly prone to more severe infections, demanding prompt and thorough treatment to prevent lasting damage․
Allergic Reactions to Jewelry
Allergic reactions to piercing jewelry are relatively common, particularly with nickel-containing metals․ Symptoms can range from mild itching and redness around the piercing site to more severe reactions like blistering, swelling, and a rash extending beyond the immediate area․ Individuals with known metal allergies should proactively opt for hypoallergenic jewelry materials like surgical stainless steel, titanium, or solid gold․
Identifying the allergen is key to management․ If a reaction occurs, switching to a different jewelry material is often the first step․ However, even “hypoallergenic” materials can sometimes contain trace amounts of allergenic metals․ In severe cases, a dermatologist may recommend topical corticosteroids to alleviate inflammation and itching․ Prolonged exposure to an allergen can lead to chronic irritation and potentially hinder the healing process, so prompt attention is crucial․
Cartilage Piercing Complications

Cartilage piercings, unlike lobe piercings, present unique challenges due to the limited blood supply to cartilage tissue․ This slower healing process increases the risk of complications, notably infections․ Cartilage infections can be more severe and difficult to treat, potentially leading to permanent disfigurement if left unaddressed․ Strict adherence to aftercare instructions is paramount․
Beyond infection, cartilage piercings are prone to overgranulation tissue formation, where the body produces excessive scar tissue around the jewelry․ This can cause bumps and discomfort․ Additionally, trauma to the piercing site – even minor bumps – can disrupt the healing process and contribute to complications․ Seeking care from an experienced piercer and diligent aftercare are vital to minimize these risks and ensure optimal healing․
Keloid Formation and Treatment
Keloids are raised, thickened scars that can develop at piercing sites, particularly in individuals predisposed to them․ Unlike typical scars, keloids extend beyond the original wound boundaries and can continue to grow․ Ear piercings, especially cartilage piercings, are common locations for keloid formation due to the skin’s reaction to trauma and the body’s attempt to heal․
Treatment options vary depending on the keloid’s size and severity․ These can include topical silicone sheets, corticosteroid injections to reduce inflammation and flatten the scar, or, in some cases, surgical excision followed by radiation therapy to prevent recurrence․ Early intervention is crucial; consulting a dermatologist is recommended if you suspect keloid formation․ Avoiding re-piercing the affected area is also essential to prevent further complications․